
Last updated on May 7, 2020
What is Arch Linux?
Arch Linux is arguably the best Linux distributions out there. It’s free and open source offering x86 and 64 bit CPU architectures. Arch is also a rolling release which means you never have to update your system with major releases. Every update with its package manager (Pacman) is the latest and greatest bleeding edge. The biggest lament is Arch Linux is agnostic when it comes to windows management or installers so newcomers to the Linux world steer clear of installing Arch to their machines. But today I will show you how easy it really is.
Let’s go grab a copy right now!
First off, we need to grab an ISO copy of Arch Linux and burn it to a USB drive for installation.
Visit https://www.archlinux.org/download/ and download the torrent.
Next we want to install to the ISO file to a USB drive.
It is usually ideal to have at least 4-8 GB drive to do this.
Head over to https://rufus.ie/ and download Rufus. Open Rufus, insert your USB drive and hit “SELECT” to chose the Arch Linux ISO (archlinux-20XX.XX.XX-x86_64.iso) you just downloaded.
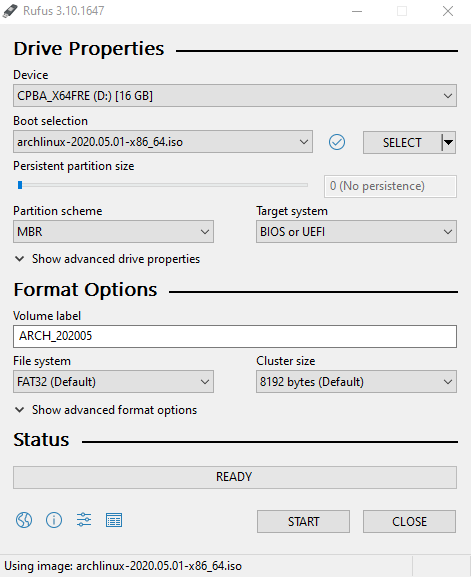
It should look like this. Then hit “START” to write. Once you have your media ready, go to the machine you are installing Arch to and boot up from your USB in the BIOS.
Let’s dive into the installation
Once Arch Linux has booted to a prompt on the machine you are installing it to, we need to connect to a wired connection or WIFI. Let’s connect to WIFI. Fire off the following command to go through the WIFI dialog.
wifi-menuWe now need to setup EFI, boot and main partitions. We use cgdisk for this.
cgdisk /dev/nvme0n1These are the partitions we need to prepare. Our EFI partition should be 100MB. The boot partition should be 250MB and then our main partition should fill the remaining size of your hard drive.
- 1 Drive – 100MB EFI Partition (Hex Code ef00)
- 2 Drive – 250MB Boot Partition (Hex Code 8300)
- 3 Drive – 100% Size System Partition (Hex Code 8300)
Let’s build the file systems for our partitions with mkfs.
mkfs.vfat -F32 /dev/nvme0n1p1
mkfs.ext2 /dev/nvme0n1p2
We want to have full encryption of our disk so we now use cryptsetup to handle the cryptography. Setup LUKS disk encryption and open to install Arch on it.
cryptsetup -c aes-xts-plain64 -y --use-random luksFormat /dev/nvme0n1p3
cryptsetup luksOpen /dev/nvme0n1p3 luks
We want to use a logical volume manager on our encrypted drive to manage drives easier later. While were at it, we can create a swap drive too.
pvcreate /dev/mapper/luks
vgcreate vg /dev/mapper/luks
lvcreate --size 8G vg --name swap
lvcreate -l +100%FREE vg --name root
Again, build the file systems on our new swap and root volumes using mkfs and mkswap.
mkfs.ext4 /dev/mapper/vg-root
mkswap /dev/mapper/vg-swap
Now it’s time to mount our volumes, EFI, and boot drives.
mount /dev/mapper/vg-root /mnt
swapon /dev/mapper/vg-swap
mkdir /mnt/boot
mount /dev/nvme0n1p2 /mnt/boot
mkdir /mnt/boot/efi
mount /dev/nvme0n1p1 /mnt/boot/efi
Install the base Arch Linux installation to our new mount.
pacstrap /mnt base base-devel grub-efi-x86_64 git efibootmgr dialog wpa_supplicant dhcpcd
               mkinitcpio lvm2 linux-hardened linux-firmware neovim
Generate a fstab file.
genfstab -pU /mnt >> /mnt/etc/fstabEdit the fstab file using nano, vi, or vim. I like vim. Add the tmpfs listing to file.
vim /mnt/etc/fstab
tmpfs	/tmp	tmpfs	defaults,noatime,mode=1777	0	0
Time to chroot into the mount point.
arch-chroot /mnt /bin/bashSet localtime and system clock.
hwclock --systohc --utcChange your hostname.
echo HOSTNAME > /etc/hostnameConfigure your language.
echo LANG=en_US.UTF-8 >> /etc/locale.conf
echo LANGUAGE=en_US >> /etc/locale.conf
echo LC_ALL=C >> /etc/locale.conf
Change the root user password and add a user.
passwd
useradd -m -g users -G wheel -s /bin/zsh MYUSERNAME
passwd MYUSERNAME
Prepare the initial ramdisk environment.
vim /etc/mkinitcpio.conf
# Add 'ext4' to MODULES
# Add 'encrypt' and 'lvm2' to HOOKS before filesystems
Create the environment.
mkinitcpio -p linux-hardenedNow it is time to install the Grub boot loader.
grub-install
vim /etc/default/grub
# Edit to 'GRUB_CMDLINE_LINUX="cryptdevice=/dev/nvme0n1p3:luks:allow-discards"'
grub-mkconfig -o /boot/grub/grub.cfg
Exit, unmount and reboot the system.
exit
umount -R /mnt
swapoff -a
reboot
Once the system has rebooted you can now login with root or your new user! Done deal!
Bonus! I3 with Gaps Tile Manager
Yeah I know. All you have is a terminal to play with. Let’s get a window manager installed. I like everything lightweight so let’s install I3 with Gaps. It’s a cool tiling manager.
sudo pacman -S i3-gaps xorg-server xorg-xinit
nvim /etc/X11/xinit/xinitrc
# Remove the final chunk of code containing twm and apps.
# Replace with: exec i3
startx
Learn more about I3 here, https://github.com/Airblader/i3
That’s it. It wasn’t as bad as it seemed, huh? Congradulations, you’re now among the growing ranks of an army of elitist Arch users. Good for you! 😀
Just looking for just the commands, I created a github gist for convenience.
michael rinderle
Michael has been a professional in the information technology field for over 20 years, specializing in software engineering and systems administration. He studied network security and holds a software engineering degree from Milwaukee Area Technical College with thousands of hours of self-taught learning as well. He mainly writes about technology, current events, and coding. Michael also is the founder of Sof Digital, an U.S. based software development Firm. His hobbies are archery, turntablism, disc golf and rally racing.
Comments are closed, but trackbacks and pingbacks are open.