
Networks are fallible. There is always the possibility that an attacker can gain access to our private networks. Many times systems administrators will implement honeypots to trip these intruders up. No, there isn’t a lovable cartoon bear at the end of these. Honeypots are actually computers deployed on the network to mimic a high value target to intrigue a hacker once they have penetrated the network and start looking for resources to exploit. In actuality, it holds nothing important other than a backend that alerts the system administrator when it is probed.
Since I am about open source software, here is a free honeypot solution for you to use in your network environments. OpenCanary, is a Python based daemon that runs canary services and transmits alerts when they have been triggered. Canary services could range from port scanning to brute-force login attempts across multiple types of typical services like web, mail or database. This allows you to be alerted instantaneously when your network has been penetrated and an intruder is trying to leverage more access into your honeypot. It’s configuration file let’s you simply configure all the services you would like to mimic for the machine to make sure it looks exactly how you want it to look.
Continue on to learn how to install OpenCanary on Ubuntu 20.04.
Installing OpenCanary
We need update the system and install Python for some build dependencies.
sudo apt-get update && sudo apt-get upgrade && sudo apt-get dist-upgrade
sudo apt-get install python3-dev python3-pip python3-virtualenv neovim
Since OpenCanary is compatible with RDPY, a Remote Desktop Procedure honeypot implemented in Twisted Python, let’s install its dependencies as well.
sudo apt-get install -y build-essential libssl-dev libffi-dev libpcap0.8-devThe honeypot daemon is meant to be run in a virtual Python environment. Virtualenv allows you to maintain Python packages specifically for a specific application. This alleviates the possiblity to break any packages globally on the system.
Create a folder for OpenCanary and create the virtual environment.
cd ~
mkdir OpenCanary
cd OpenCanary
virtualenv env/
Activate the environment so we can install the Python packages.
. env/bin/activateNotice, you will see the prompt change with the prefix (env). That means you are in your new environment.
Time to install the Python packages. OpenCanary, Scapy, Pcapy and RDPY.
pip install opencanary
pip install scapy
pip install pcapy
pip install rdpy
With everything installed, we can configure OpenCanary. Copy the config file with the following command.
opencanaryd --copyconfigNow open with you favorite editor. I prefer NeoVim.
nvim ~/.opencanary.confThere are two things we need to configure with the .opencanary.conf file:
You can change your device.node_id to a unique identifier for each instance of the OpenCanary daemon.

To get email alerts, we need to change the SMTP settings to our email server settings and credentials.
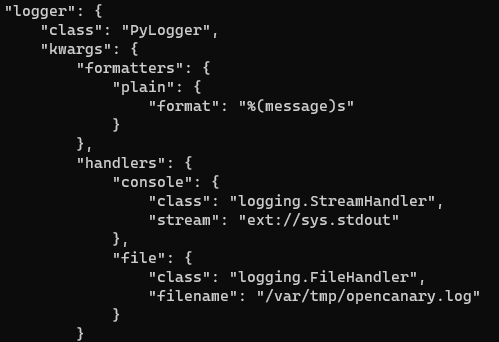
Look for logger.kwargs.handlers:
In OpenCanary documentation, they provide the JSON template for this with a email account.
Add the following with your credentials set.
[..] # Services configuration
    "logger": {
    "class" : "PyLogger",
    "kwargs" : {
        "handlers": {
            "SMTP": {
                "class": "logging.handlers.SMTPHandler",
                "mailhost": ["smtp.gmail.com", 587],
                "fromaddr": "[email protected]",
                "toaddrs" : ["[email protected]"],
                "subject" : "OpenCanary Alert",
                "credentials" : ["youraddress", "abcdefghijklmnop"],
                "secure" : []
             }
         }
     }
 }
With alerts setup we can run OpenCanary.
cd ~/OpenCanary
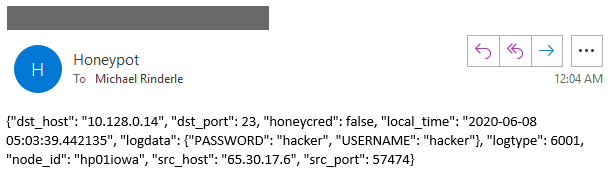
opencanaryd --startWhen it starts you will get two logs that will be sent to your log file and email.

If you receive these messages on start you have configured OpenCanary correctly.
Testing the honeypot
Now that we have everything configured and running, we can go ahead and test the honeypot. Let the fake Telnet server to log anyone that tries to access the insecure protocol. Keep in mind that I enabled Telnet in the configuration file, .opencanary.conf.
telnet <HoneypotIPAddress>OpenCanary pretends to be a FTP server, allows a connection and asks for credentials.
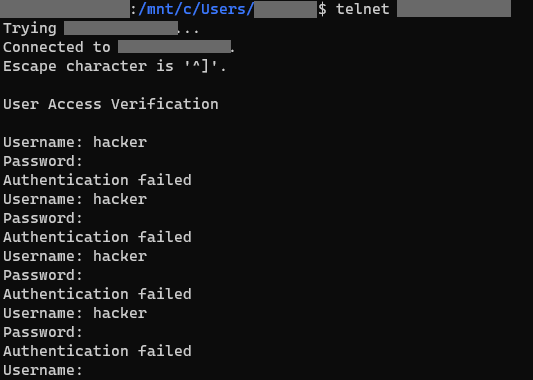
Here we have the attacker scratching their head while incident response has already been alerted.
Deploying a honeypot is not a be all end all for security. Security is always depth in defense and this option is to waste as much time of the attacker that penetrated the network until the blue team can logon and mitigate the situation. When everything else fails, a hacker going after the honeypot first could be the one thing that saves your network, or you even finding out at all that you have been compromised.
michael rinderle
Michael has been a professional in the information technology field for over 10 years, specializing in software engineering and systems administration. He studied network security and holds a software engineering degree from Milwaukee Area Technical College with thousands of hours of self taught learning as well. He mainly writes about technology, current events, and coding. Michael also is the founder of Sof Digital, an U.S. based software development Firm. His hobbies are archery, turntablism, disc golf and rally racing.
Comments are closed, but trackbacks and pingbacks are open.